stairway to vegan

Sharing a journey into the world of fabulous vegan food.


4 Comments

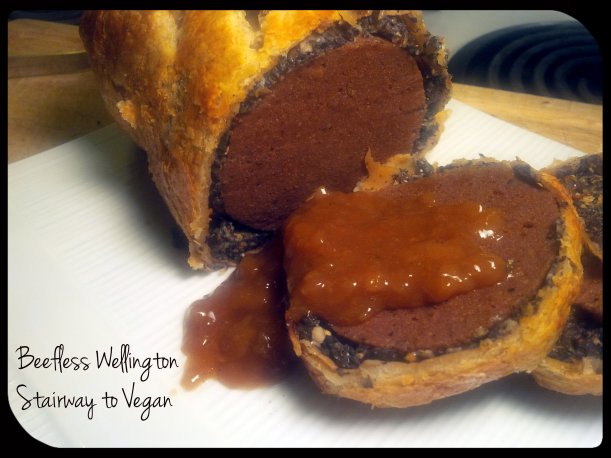
Beefless Wellington and KFC (Kentucky Fried Cauliflower) Re-create a restaurant meal #veganmofo day six #vgnmf15

Wow, here we are at day six already, time is flying by as usual. There should be a term “mofo time” kind of like tropical island time, but the opposite. In mofo land, time speeds up and flies by before you know it.

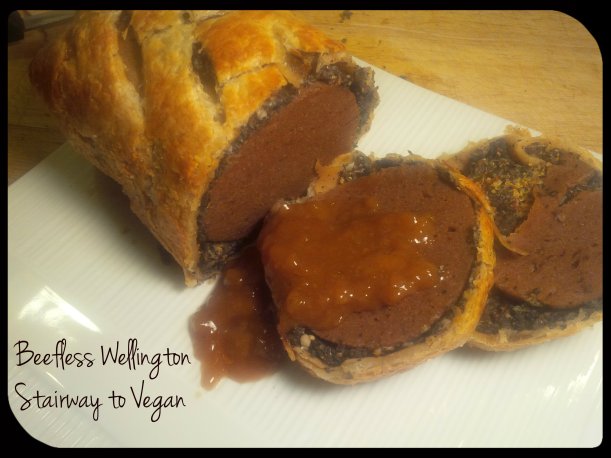
Beefless Wellington

Beefless Wellington

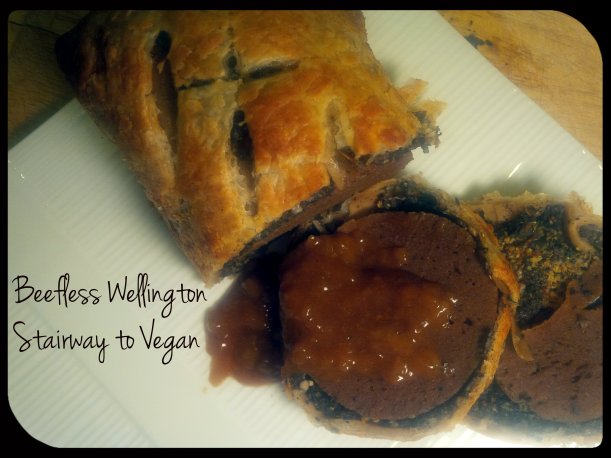
Anyway back to mofo day six and our prompt “Re-create a restaurant meal”. I have two restaurant meal recipes for you. The first is Beefless Wellington. You see this at high end restaurants and I wanted to try and replicate the concept of roast beef smothered in a mushroom garlic pesto then wrapped in puff pastry and baked to perfection.

KFC (Kentucky Fried Cauliflower)

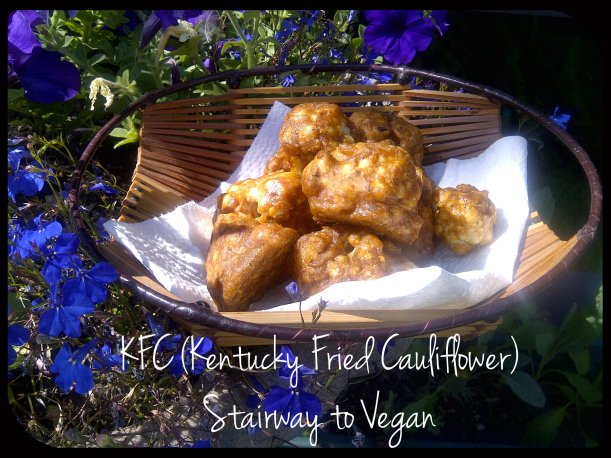
KFC (Kentucky Fried Cauliflower)

The second is a take on KFC, but this time it is Kentucky Fried Cauliflower. Now, there could be a debate on whether KFC is a restaurant, but I am not going there. Last summer I did a post on this and explained how I live one block “down wind” of a local KFC and the aroma that greets me almost on a daily basis has me drooling in my driveway. So for this post, I will link back to that post for the commentary regarding KFC and here for a recipe to satisfy your “finger licking good” cravings.

Enjoy,

96B4F31D4DF30EE65A022CF611762965


Beefless Wellington

Beefless Wellington

Beefless Wellington

Serves 4

  • 1 beefless roast
  • 2 Tblspns Dijon mustard
  • 2 Tblspns olive oil
  • 1/2 lb mushrooms cleaned and sliced
  • 4 Tblspns dry red wine
  • 3  cloves garlic crushed
  • 1/2 tspn thyme
  • 6 – 8 slices vegan chicken or turkey
  • 1 packet vegan puff pastry
  • 2 Tblspns non dairy milk

Beefless Roast

  • 1 cup Vital Wheat Gluten
  • 4 Tblspns chickpea flour
  • 4 Tblspns nutritional yeast
  • 2 tspns onion power
  • 2 tspns garlic powder
  • 1 Tblspn vegan worsteshire sauce
  • 1/4 tspn ground pepper
  • 1   cup water
  • 1 Tblspn olive oil
  • 1 Tblspn tamari
  • 1 tspn browning liquid (optional)
  • 8 cups vegetable broth for simmering

Combine all liquid ingredients. In separate bowl, combine all dry ingredients. Add liquid ingredients to dry and mix well. If necessary add a little more chickpea flour to make a dough like ball. Knead for 5 mins to develop gluten.  Form into a loaf. Wrap in cheesecloth loosely and tie the ends.

Bring vegetable broth to a boil, lower dough in and bring back to a slow simmer. Cover and simmer (do not boil) for  on hour turning occasionally. Allow to cool in broth. When cool, remove from broth and put in a Ziploc bag with 1/4 cup of broth and refrigerate overnight,

Brush roast with mustard on all sides.  Preheat oven to 400 F,

Place mushrooms, garlic and thyme in food processor and process into a pesto. Add to frying pan with olive oil. Sauté for 10 mins until mushrooms have released their moisture and most of it has cooked down. Cool.

Lay out piece of plastic wrap on counter. Place turkey/chicken slices on top overlapping to make a square that is slightly wider than your roast and long enough to wrap completely around.

Spread mushroom pesto on top of turkey slices. Place roast in the middle and wrap with turkey slices using the plastic wrap to help you roll it up. Tuck in ends as you go. Wrap tightly in plastic wrap and refrigerate for 20 mins.

Lay pastry down on lightly floured surface and roll out to a rectangle slightly larger than the previous turkey square.

Place roast in middle of pastry and roll up inside pastry, securing the ends and making sure the roast is completed encased.

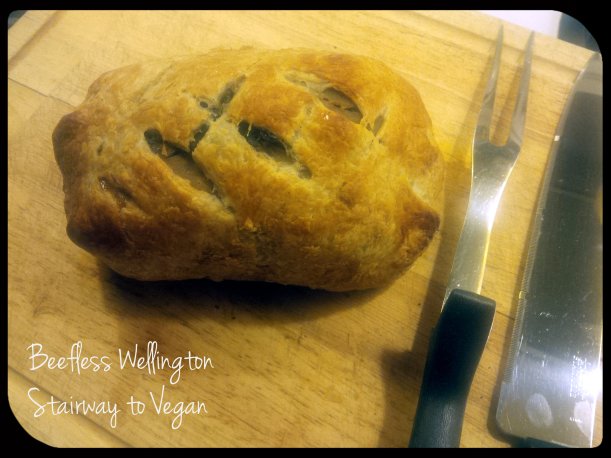
Place seam side down on a  baking tray. lightly score the top with slits to allow steam to escape. Brush with milk, bake in oven 25 – 25 mins until golden.

Beefless Wellington

Beefless Wellington

Let sit 10 mins before slicing and serving with your favourite gravy.

Beefless Wellington

Beefless Wellington


Leave a comment

fantastic new vegan cheerse making kit

https://www.kickstarter.com/projects/1689293047/discover-these-secrets-for-making-vegan-non-dairy
please visit this link for Information about a brand new line of vegan cheese making kits. I have made a number of vegan cheeses from this chefs recipes and they have all turned out amazing.

Enjoy,
Tracy


2 Comments

Strawberry Champagne Pearl Soup with Palmiers #veganMoFo

Strawberry Champagne Pearl Soup with Palmiers

Strawberry Champagne Pearl Soup with Palmiers

The last day of MoFo and it is time to celebrate. Another month of blogging comes to an end. I will miss my morning fix of radomofo, browsing the blogs and seeing all the great recipes, ideas, pictures and funny stories.

While I will miss MoFo, I will also enjoy a short break. Just enough time to recharge the batteries and get the creative juices flowing again.

In the meantime, I have finished my month of “Soup and Bread” with a dessert.

This soup is nice and cold. It is not overly sweet, but the addition of the Palmiers will add in the sweetness. Confession time: the recipe uses Tapioca Pearls, however, I could not find any at my store today and had run out of time to look further, so I substituted them for Orzo pasta. I think the Tapioca would have given the soup a nicer, creamier taste. I also added a dollop of cashew creme and a few fresh Lemon Verbena leaves for garnish.

Enjoy,

96B4F31D4DF30EE65A022CF611762965

Strawberry Champagne Pearl Soup with Palmiers

Strawberry Champagne Pearl Soup with Palmiers

Strawberry Champagne Pearl Soup

Serves 8

  • 4 cups water
  • 1/4 cup tapioca pearls
    9 cups strawberries (frozen can be used)
    1 cup sugar
    1 lemon, juiced
    1/2 cup Champagne or sparkling white wine
    6 mint leaves, plus more, for garnish or lemon vegans leaves
    1 cup cashew creme (soak 1 cup cashews in water overnight, drain, blend with equal amount of cold water in blender until creamy and smooth)

In a saucepan, bring water, tapioca, strawberries, sugar, lemon juice, and Champagne to a boil. Let simmer for 10 minutes, then add mint leaves. Let cool to room temperature.

Blend together with an immersion blender or in a standing blender, then strain through a sieve. Chill in the refrigerator, covered, for 3 hours.

Serve soup in glasses with a dollop of cashew creme and garnish with mint or lemon verbena leaves.


Strawberry Champagne Pearl Soup with Palmiers

Strawberry Champagne Pearl Soup with Palmiers

Vegan Palmiers

Serves 8

  • 1 cup  sugar
    1 pinch salt
    1 sheet Pepperidge Farm puff pastry (double-check, but I found this brand to be vegan), defrosted but still very cold.

Preheat the oven to 450 degrees. Combine the sugar and salt. Pour 1/2 cup of the mixture onto a pastry board or other flat surface covered with parchment paper and spread it around. Unfold the sheet of puff pastry onto the parchment and pour the other half cup of the sugar mixture on top, and spread it evenly to cover the puff pastry.Cover with a second sheet of parchment paper and using a rolling-pin, roll the pastry until it’s a 12” square and sugar is pressed in all around. Remove the top sheet of parchment paper. Fold the sides of the pastry square toward the center so they go halfway to the middle point. Then fold one half over the other, like closing a book. You should have 6 layers. Slice the pastry “book” into 8 slices and place them cut-side up on parchment-lined baking sheets leaving plenty of space between each one.

Bake the cookies for 6 minutes or until caramalized and brown on the bottom. Then turn and bake for another 3-5 minutes until caramalized on the other side. Transfer to rack to cool.

Strawberry Champagne Pearl Soup with Palmiers

Strawberry Champagne Pearl Soup with Palmiers

Nutrition Facts
Serving Size 267 g
Amount Per Serving
Calories 362 Calories from Fat 76
% Daily Value*
Total Fat 8.5g 13%
Saturated Fat 1.6g  8%
Cholesterol 0mg 0%
Sodium 24mg 1%
Potassium 355mg 10%
Total Carbohydrates 71.7g 24%
Dietary Fiber 4.0g 16%
Sugars 59.0g
Protein 3.8g
Vitamin A 0% Vitamin C 165%
Calcium 4% Iron 10%
Nutrition Grade B
* Based on a 2000 calorie diet

Nutritional Analysis

Good points
Bad points
Strawberry Champagne Pearl Soup with Palmiers

Strawberry Champagne Pearl Soup with Palmiers


Leave a comment

Salad Jars #vegan #saladinajar

Salad Jar's

Salad Jar’s

I love salad in the summertime. I take one to work with me every day for lunch. Sometimes I make it in the morning and other times I just take all the ingredients with me to work and construct the salad in the kitchen there.

Recently I was at a Chapters bookstore and I saw the front cover of a book dedicated to making all kinds of different salad’s in large mason jars. What a great idea.

Here I put my dressing in the bottom and then added chickpeas, and then layered the other salad ingredients until finally I added the lettuce, spinach, arugula mix at the very top. This way the lettuce does not get the dressing on it until you are ready to eat and does not get all soft and wilted.

I also cheated, slightly, by using whole cherry tomato’s. Not only do they look incredibly pretty in the jar, but because they are whole and not cut, the tomato’s also dont get soft.

You can use your imagination for the ingredients, I am thinking of adding mushrooms, snow peas, corn, dried fruits, nuts…….there really is no limit to what you could add (other than avocado or perhaps banana or any other item that will brown upon cutting). Just keep in mind that the idea is to keep the dry ingredients at the top and the wet at the bottom.

Salad Jar's

Salad Jar’s

I made three jars to see how well they keep and am happy to advise that on day two, everything is just as fresh and delicious as day one. How nice to open my fridge in the morning and just grab a jar and head to work. And they look really pretty sitting on the shelf.

Enjoy,

96B4F31D4DF30EE65A022CF611762965

Salad Jar's

Salad Jar’s

Salad Jar’s with Dijon and Olive Oil Dressing

Makes 3 jars

Dressing

  • 2 Tblspn’s olive oil
  • 1 Tblspn balsamic vinegar
  • 1 Tblspn dijon mustard
  • 4 Tblspns water

Salad Ingredients

  • 1 can chickpeas rinsed
  • 1 1/2 red peppers diced
  • 1 English cucumber diced
  • 1/2 Head Fennel chopped finely
  • 1 pint cherry tomato’s
  • 6 cups salad greens
  • 3 large mason jars


To make dressing, combine all ingredients in a bowl and whisk until completely combined and emulsified.

Divide the dressing between the three large mason jars.

Divide the salad ingredients between the three jars layering:

chickpeas then red peppers, then cucumbers, then fennel, then cherry tomato’s then salad greens.

Store upright in fridge until ready for use.

When ready to serve, shake briefly then empty out onto plate. You may need to help the salad greens out.

Salad Jar's

Salad Jar’s

Nutrition Facts
Serving Size 579 g
Amount Per Serving
Calories 562
Calories from Fat

144
% Daily Value*
Total Fat 16.0g 25%
Saturated Fat 2.0g 10%
Trans Fat 0.0g
Cholesterol 0mg 0%
Sodium 190mg 8%
Potassium 1364mg 39%
Total Carbohydrates 85.0g 28%
Dietary Fiber 26.1g 104%
Sugars 14.7g
Protein 27.4g
Vitamin A 96% Vitamin C 103%
Calcium 23% Iron 51%
Nutrition Grade A
* Based on a 2000 calorie diet

Nutritional Analysis

Good points
Salad Jar's

Salad Jar’s


Leave a comment

Corn Tortilla Nacho’s with Cramy Golden Cheez Sauce #vegan #nachos #cheez sauce

Corn Tortilla Nacho's with Creamy Golden Cheez Sauce

Corn Tortilla Nacho’s with Creamy Golden Cheez Sauce

Time sure goes by fast, I cannot believe this blog is already one year old. Yes, the very first posting was May 30,2013. So here we go with the first post of the second year. Thank you to everyone who is reading and following. I love hearing your comments. 🙂

This dish says “Summer” to me. Nacho’s are great at an outdoor bbq, or sitting on the deck with a nice cold beer or glass of wine. The wonderful colours of the golden cheez sauce, the bright vivid green of the jalapeno and the cherry red of the tomato’s are fresh and vibrant.

I used my Dehydrated Corn Chip recipe and topped them with tons of thinly sliced jalapeno pepper, halved cherry tomato’s and chunks of fresh creamy avocado. Then I poured the creamy cheez over the top. A couple of sprigs of parsley and this delicious dish was done. You know the recipe is good when you use your fingers to wipe up the last tiny bits of sauce off the plate….yum.

Enjoy,

96B4F31D4DF30EE65A022CF611762965


Corn Tortilla Nacho's with Creamy Golden Cheez Sauce

Corn Tortilla Nacho’s with Creamy Golden Cheez Sauce


Corn Tortilla Nacho’s with Creamy Golden Cheez Sauce

Serves 6

Cheez Sauce

  • 2 cups plain unsweetened soy milk
  • 5 Tblspns corn starch or tapioca flour
  • 1/4 cup light tasting vegetable oil
  • 1/2 cup nutritional yeast
  • 1 Tblspn white miso paste
  • 2 tspn tomato paste
  • 1 tspn apple cider vinegar
  • 1 tspn dry mustard powder
  • 1/2 tspn sea salt
  • 1/2 tspn onion or garlic powder

Mix all ingredients in a blender or food processor until smooth and totally combined.

Pour into a saucepan and cook over medium heat, stirring constantly until  the mixture begins to bubble and thicken. Continue to cook and stir until mixture is thick and glossy.  Removed from heat. To use as a pourable sauce, keep warm. The sauce will thicken more when cold. If necessary you can add additional soy milk while cooking to give you the texture you want.

  • Corn chips
  • cherry tomato’s
  • jalapeno pepper
  • avocado
  • parsley

Place corn chips on a plate.

Top with sliced jalapeno peppers, cherry tomato’s and avocado. Pour cheez sauce over top and sprinkle with parsley

Corn Tortilla Nacho's with Creamy Golden Cheez Sauce

Corn Tortilla Nacho’s with Creamy Golden Cheez Sauce

Nutrition Facts
Serving Size 334 g
Amount Per Serving
Calories 534
Calories from Fat 291
% Daily Value*
Total Fat 32.3g 50%
Saturated Fat 4.8g 24%
Trans Fat 0.0g
Cholesterol 0mg 0%
Sodium 305mg 13%
Potassium 1147mg 33%
Total Carbohydrates 46.8g 16%
Dietary Fiber 15.4g 62%
Sugars 7.3g
Protein 18.8g
Vitamin A 5% Vitamin C 206%
Calcium 15% Iron 38%
Nutrition Grade A
* Based on a 2000 calorie diet

Nutritional Analysis

Good points


Corn Tortilla Nacho's with Creamy Golden Cheez Sauce

Corn Tortilla Nacho’s with Creamy Golden Cheez Sauce


Leave a comment

Lettuce Wrapped Burger #vegan #soyfree

Lettuce Wrapped Burgers

Lettuce Wrapped Burgers

Lettuce Wrapped Burgers

What wonderful weather we are (finally) having. Two warm sunny weekends in a row…….now you know what that means…..yes, the bbq has been fired up and put to very good use.

I have currently been discovering some wonderful recipes from “The Gentle Chef”. Chef Skye Michael has three cookbooks available. I have the first two and have found some wonderful goodies. He uses Vital Wheat Gluten for a lot of his “meatless” dishes. I am one of the fortunate people who do not have any issues consuming gluten. Having said that, I believe it is always a case of moderation. I love his burger recipe (below) for a treat when I am craving a juicy, chewy, “meaty” burger. I have not found any commercially prepared vegan burgers that satisfy all my cravings. These burgers are truly amazing. The recipe is also available on The Gentle Chef website. This is a great website to visit with tons of amazing recipes.

At first glance this recipe appears to be complicated, however it is really quite easy. Chef Skye give lots of clear instructions, which is what makes it look like more work than it is. The end result is definitely worth it. I am now making these in double batches and freezing them.

I decided to use lettuce instead of bread for these burgers (again the moderation thing…..the burgers have gluten, so don’t need to overload by adding in bread as well). This way I could also eat two and not feel guilty…..:)

I topped my burgers with sliced avocado, tomato and some delicious mustard brought back from Germany for me by a very good friend.

These were pure summer fun to eat.

Enjoy,

96B4F31D4DF30EE65A022CF611762965


Lettuce Wrapped Burgers

Lettuce Wrapped Burgers

Lettuce Wrapped Burgers

Makes 6

  • For the dry ingredients you will need:
    • 1 cup vital wheat gluten
    • 2 T garbanzo bean flour or soy flour
    • ½ tsp smoked paprika
    • ¼ to ½ tsp coarse ground black pepper
    • ⅛ tsp ground rosemary
  • For the liquid ingredients you will need:
    • ¾ cup water
    • ¼ cup fresh shredded onion, including liquid (see the technique below for instructions)
    • 2 T tamari, soy sauce or Bragg Liquid Aminos™
    • 1 T vegan Worcestershire Sauce
    • 1 T olive oil
    • 1 tsp liquid smoke
    • ½ tsp browning liquid

Toppings:

  • 1 avocado sliced
  • 1 tomato sliced
  • Romain lettuce leaves
  • mustard

For burgers with a uniform appearance, you will need a 3 and ½-inch ring mold. The burgers can also be shaped free-form if desired.

Technique:
Place a stainless steel wire rack on a baking sheet and line the rack with parchment paper. This will provide a layer of air between the rack and the baking sheet which will prevent the bottom of the burgers from over-browning.

Preheat the oven to 350°F.

Stir together the dry ingredients in a large mixing bowl.

To shred the onion, cut the top and bottom from a large onion and peel away the outer layer. Shred the onion from the top or bottom end (which helps keep the rings from separating), using the largest holes on a box grater. Shred enough pulp to fill ¼ cup, including as much of the onion liquid as possible. Add the wet pulp to the other liquid ingredients in a separate bowl or measuring cup and stir.

Pour the liquid ingredients into the dry ingredients in the mixing bowl and stir just until the ingredients are combined. Do not overwork the dough as the dough will become elastic and the burgers will be difficult to shape. The dough will be soft, wet and at saturation; this is necessary for producing the proper texture.

Divide the dough in the bowl into roughly 6 equal portions (divide the dough in half and each half into thirds).

Pick up a piece of dough and form it into a ball in your hands. Lay the ring mold on a work surface and press the ball of dough to fill the ring. If you don’t have a mold, simply press and shape the burgers free-form with your fingers.

Place the burgers onto the parchment paper and cover the baking sheet with foil. Crimp the edges to seal the foil around the baking sheet and place on the middle rack of the oven. Bake for 45 minutes.

Lettuce Wrapped Burgers

Lettuce Wrapped Burgers

Remove the baking sheet and let the burgers cool with the foil cover in place. When sufficiently cool, remove the foil and transfer and stack the burgers on the foil. Fold to create a package and refrigerate for a minimum of 8 hours, or for up to 10 days, before grilling. Chilling will firm and enhance the burger texture. The burgers can also be wrapped in the foil between layers of wax paper or parchment paper and frozen for up to 3 months; just be sure to thaw the completely before grilling.

To grill the burgers on the stove, oil a non-stick skillet or grill pan and place over medium heat. Brush the burgers with liquid smoke or your favorite sauce, if desired, and pan-sear them until nicely browned. For outdoor grilling, brush the burgers with cooking oil and then liquid smoke or your favorite sauce, if desired. Grill over hot embers or a medium gas flame until grill marks appear. Avoid overcooking. Serve with your favorite condiments.

Lettuce Wrapped Burgers

Lettuce Wrapped Burgers

Nutrition Facts
Serving Size 133 g 1 burger
Amount Per Serving
Calories 268
Calories from Fat 87
% Daily Value*
Total Fat 9.7g 15%
Saturated Fat 1.7g 9%
Trans Fat 0.0g
Cholesterol 0mg 0%
Sodium 379mg 16%
Potassium 213mg 6%
Total Carbohydrates 13.5g 4%
Dietary Fiber 2.8g 11%
Sugars 1.3g
Protein 33.5g
Vitamin A 5% Vitamin C 9%
Calcium 1% Iron 3%
Nutrition Grade C+
* Based on a 2000 calorie diet

Nutritional Analysis

Good points


Leave a comment

Vitality Salad with Oil Free Zesty Italian Dressing

It’s SPRING……Finally, we made it through the winter. There is always a thought around the begining of March, that we might be stuck in winter for ever…..well, the thought crosses my mind anyway.

Unfortunatley, it is still quite cold and the ever present threat of snow continues.

So, to celebrate the soon to be here warm weather, it is time for a wonderful salad.


Vitality Salad with Zesty Oil Free Italian Dressing

Vitality Salad with Zesty Oil Free Italian Dressing

This salad was delicious. A nice mix of greens and fresh vibrant veggies. To make it even more interesting I added in sprouts that I had just sprouted in my kitchen. For those of you who have not tried growing your own sprouts, it is really simple and the end result is a wonderful tasty vitamin packed sprout. I usually end up eating them as a snack before they make it into a meal.

The Italian Dressing is oil free but nice and thick and spicy. You can adjust the ingredients to your own liking. I love garlic, so lots went in.

Vitality Salad with Zesty Oil Free Italian Dressing

Vitality Salad with Zesty Oil Free Italian Dressing

Enjoy,

96B4F31D4DF30EE65A022CF611762965


Vitality Salad with Zesty Oil Free Italian Dressing

  • 1 cup cold water or light vegetarian broth
    2 tsp cornstarch
  • 1/4 cup red wine vinegar
    1 Tbsp Dijon-style prepared mustard
    1-2 cloves garlic, crushed
    1 tsp fine sea salt
    1 tsp dried basil
    1/4 tsp paprika
    pepper to taste

Gently heat water and cornstarch in small pot. Simmer gently until liquid is almost clear and thick.

Remove from heat and cool.

Combine cornstarch liquid and all other ingredients in a jar and shake vigorously to combine.

This will make approx 1 1/4 cups of dressing. Store in airtight container in the fridge.The dressing will thicken up even more once completely chilled.


Nutrition Facts
Serving Size 9 g
Amount Per Serving
Calories 10
Calories from fat 3
% Daily Value*
Total Fat 0.3g 1%
Trans Fat 0.0g
Cholesterol 0mg 0%
Sodium 188mg 8%
Potassium 16mg 0%
Total Carbohydrates 1.2g 0%
Protein 0.3g
Vitamin A 1% Vitamin C 0%
Calcium 1% Iron 1%
Nutrition Grade A
* Based on a 2000 calorie diet

Nutritional Analysis

Good points
Bad points


Leave a comment

Sushi, Vegan MoFo Recipe #15

Sushi

Sushi

Every now and then I get a craving for Sushi.

I often make sushi with quinoa and brown rice, but this time, I went with the traditional white sticky rice. Sometimes you have to just go with the traditional.

It is really hard to estimate how much of each vegetable you will need, I usually have lots left over, but I just use the leftovers for a stirfry or to toss into a salad.

You can change the vegetables to suit your taste or what you have available, In the past I have used cucumber, snow peas, cabbage, daikon radish and shredded kale. I always add avocado for the creamy texture, but other than that, let your imagination run riot.

When you are preparing your vegetables, you need to slice them into long very thin strips.

I use a sushi mat to help roll the sushi, but you could also use a piece of parchment paper or aluminum foil.

I am heading to a three day conference in Toronto for work, so I am preparing a couple of extra recipes ahead of time. I have tofu marinating away in the fridge for a tasty Apricot Tofu Curry, that will be supper tomorrow night, and a Hearty Split Pea Soup for my Soup Sundays mini theme.

Enjoy,

96B4F31D4DF30EE65A022CF611762965

Sushi

Sushi

Sushi

makes 32 pieces

  • 1 cup uncooked sticky rice
  • 2 tblspns white wine or rice vinegar
  • 8 thin strips zucchini
  • 16 thin strips carrot
  • 1/2 avocado sliced thinly
  • 1/2 red pepper thinly sliced
  • 4 nori sheets
  • soy sauce for dipping

Rinse rice under cold water. Put in pot with  1 2/3 cups cold water. Place over high heat. Bring to a boil, cover, reduce heat to low and cook without touching for 15 mins.

Remove from heat and allow to cool. Add vinegar and mix. Set aside

Place one nori sheet on sushi mat. Cover with 1/4 of the rice, leaving 1/2 inch at top end bare. Make sure the rice is spread evenly over Nori,

Sushi

Sushi

Place 4 stips of carrot along the bottom (approx 1 inch up from edge) horizontally. Top with two strips of zucchine, 1/4 red pepper strips and 1/4 avocado.

Sushi

Sushi

Bring nori sheet up from bottom and roll tightly moving away from you. Wet the top edge with a little water to help stick. Roll completely inside sushi mat (or parchement paper). Press firmly along the roll to compress.

Sushi

Sushi

Repeat with remaining nori sheets, rice and vegetables.

Cut each log into eight equal pieces using a very sharp knife.

Sushi

Sushi

Serve with soy sauce to dip.

Sushi

Sus

Nutrition Facts
Serving Size 46 g
Amount Per Serving
Calories 33 Calories from Fat 8
% Daily Value*
Total Fat 0.9g 1%
Trans Fat 0.0g
Cholesterol 0mg 0%
Sodium 5mg 0%
Total Carbohydrates 5.8g 2%
Dietary Fiber 0.9g 3%
Sugars 0.6g
Protein   0.8g
Vitamin A   13% Vitamin C 6%
Calcium 0% Iron 0%
Nutrition Grade B+
* Based on a 2000 calorie diet

Nutritional Analysis

Good points


1 Comment

Whole Grain Pizza with Smokey Chickpea Cheese and Roasted Vegetables, Vegan MoFo Recipe #14

Whole Grain Pizza with Smokey Chickpea Cheese and Roasted Vegetables

Whole Grain Pizza with Smokey Chickpea Cheese and Roasted Vegetables


Mmmm, I love Pizza. This pie was made with a purchased whole grain thin crust base. You could also use a flatbread, wrap or pita.

What I don’t love about pizza is feeling guilty after I eat it. Too much oil and grease.

With this pizza, there is no guilt involved. The whole grain base is thin and not at all heavy. The Chickpeas Cheese, is light but has such incredible flavour (it almost didn’t make it onto the pizza, after I tasted it, I seriously considered just sitting down with a spoon and eating it out of the bowl) and the vegetables are freshly roasted, soft and delicious.

This makes four servings. Or, as in my case, one supper and a slice to take to work the next day for lunch (which I actually ate first thing in the morning because I knew it was in my lunch bag and couldn’t wait till lunch to eat it) Yes, I ate three slices for supper, but it was so good and I enjoyed every bite.

Let me know if you can stop at one slice 🙂

Enjoy,

96B4F31D4DF30EE65A022CF611762965

Whole Grain Pizza with Smokey Chickpea Cheese and Roasted Vegetables

Whole Grain Pizza with Smokey Chickpea Cheese and Roasted Vegetables


Whole Grain Pizza with Smokey Chickpea Cheese and Roasted Vegetables


  • I thin crust whole grain pizza base

Smokey Chickpea Cheese:

  • 1/2 tin chickpeas drained
  • 1 head oven roasted garlic
  • 1/4 cup nutritional yeast
  • juice of half a lemon
  • 1/4 tspn smoked paprika
  • 2 – 4 tblspns water

Roasted Vegetables:

  • 2 – 4 tblspns olive oil
  • 1/2 small yellow zucchini sliced
  • 1 tomato coarsely sliced
  • 3 cremini mushrooms sliced
  • 1 small onion sliced
  • 1/2 red pepper sliced
  • handful baby spinach or baby bok choy
  • fresh ground black pepper

Preheat oven to 375

Toss vegetables with olive oil and spread on baking tray.

Whole Grain Pizza with Smokey Chickpea Cheese and Roasted Vegetables

Whole Grain Pizza with Smokey Chickpea Cheese and Roasted Vegetables

Bake at 375 for 10 – 15 mins.

At the same time, cut the very top off the head of garlic, drizzle with olive oil and bake with the veggies.

remove vegetables from oven and set aside.

Squeeze garlic soft garlic cloves out of peel.

Place garlic cloves,  chickpeas, nutritional yeast, lemon juice and paprika into food processor. Process until smooth and creamy, adding water if necessary. You will need to scrape down the sides a couple of times.

Spread the chickpea mixture on the pizza base.

Spread the roasted vegetables on top.

Return to oven and bake for 10 – 15 mins.

Whole Grain Pizza with Smokey Chickpea Cheese and Roasted Vegetables

Whole Grain Pizza with Smokey Chickpea Cheese and Roasted Vegetables

Note: Nutritional Information below does not include the pizza base.


Nutrition Facts
Serving Size 222 g
Amount Per Serving
Calories 377
Calories from Fat 160
% Daily Value*
Total Fat 17.8g 27%
Saturated Fat 2.4g 12%
Cholesterol 0mg 0%
Sodium 22mg 1%
Total Carbohydrates 43.0g 14%
Dietary Fiber 13.0g 52%
Sugars 8.3g
Protein 16.2g
Vitamin A   22% Vitamin C 99%
Calcium 8% Iron 35%
Nutrition Grade A
* Based on a 2000 calorie diet

Nutritional Analysis

Good points


3 Comments

Roasted Tomatillo and Green Olive Salsa Verde with Raw Vegan Corn Chips, Vegan MoFo Recipe #13

Salsa Verde

Salsa Verde

I made this recipe a few weeks ago when I was lucky enough to receive a basket of fresh tomatillo’s from our CSA farmers. This salsa is nice and spicy with a lovely fresh taste. I paired it with raw corn chips. The corn I used was fresh, uncooked right off the cobbs. Now this is a messy process. When I started, I had corn kernels flying everywhere. In fact, I am still finding them in odd places in the kitchen. I soon come up with  the idea of cutting the kernels off the cobb inside a plastic bag, much more effective and less mess 🙂

I use a dehydrator to “cook” my corn chips, however you can also cook them on the lowest setting your oven has and let them cook with the oven door slightly open. You will  have to keep checking them every 10 or 15 mins until they are dry and crisp.

Enjoy,

96B4F31D4DF30EE65A022CF611762965


Salsa Verde Prep

Salsa Verde Prep

Roasted Tomatillo and Green Olive Salsa Verde
Serving Size: makes 1 1/2 cups

Ingredients

1 1/2 pounds tomatillos, husks removed
6 garlic cloves
2 jalapeno peppers
1 tablespoon olive oil
1 cup green olives
1 cup cilantro
1 lime, juiced
1 teaspoon sugar
1/2 teaspoon salt
1/3 cup water

Instructions:

Heat oven to 475 degrees. Spread tomatillos, garlic cloves and jalapeno on baking sheet and coat evenly with oil.

Roast for 15 minutes or until tomatillos are browned and blistered.
Remove from oven and place in a food processor or blender with olives, cilantro, lime and sugar. Pulse 5-7 times. Add water and pulse another 4-5 times to mix.
Serve with corn chips or as a condiment.

Raw Corn Chips

1 cup flax seeds

2 cups water

1 cup almonds soaked for at least 4 hours to soften

2 cups fresh corn kernel’s (see above for ways to avoid crawling around on the floor trying to find al the kernels that go airborne)

2 cups chopped yellow pepper

½ onion finely chopped

1 tblspn cumin

2 tblspns oregano

2 tblspns lime juice

Pinch sea salt.

Grind flax seeds (or purchase ready ground), add to 2 cups water and let sit until gel forms.

Drain almonds; blend in food processor until smooth. Add to flax gel, set aside.

In food processor combine corn, yellow pepper, onion, cumin, oregano, lime juice and salt. Process until smooth.

Combine almond flax mixture with corn mixture. Blend well.

Spread mixture thinly on dehydrator trays. Score into required serving sizes.


Raw Vegan Corn Chips


Dehydrate at 110 F for 7 hours, turn over and dehydrate for additional 7 hours. Once completely dry and crisp, remove from dehydrator and store in airtight glass jar.

Alternately, you can “cook” in the oven on the lowest setting, with the door left slightly open. I am not sure how long this will take. Check every 15 mins or so.


Salsa Verde

Salsa Verde