There are only two kinds of people in this world, those that LOVE Tuna Casserole and those that HATE Tuna Casserole. Interesting side note here, would it be the same people who love or hate Christmas fruit cake…..I LOVE both 🙂
This recipe uses mashed chick peas as the Tuna substitute. I mashed them with a fork so that they did not get too smooth.
The “fishy” taste comes from dulse flakes, a mild seaweed with a fresh salty side to it, perfect for this recipe.
Enjoy,
Classic Tuna(less) Casserole
Serves 4
1 can chickpeas drained and mashed with a fork
2 cups cooked pasta (I used mini lasagne noodles)
1/2 onion finely diced
1 can coconut milk
1/2 cup frozen green peas
1 or 2 Tblspns dulse flakes (depending on how much of a “fishy” taste you like)
1 tspn lemon pepper
crushed potato chips (enough to cover top)
2 Tblspns nutritional yeast
Combine all ingredients except potato chips and nutritional yeast,
Put in casserole dish. Cover with crushed potato chips, sprinkle with nutritional yeast,
Bake uncovered in 325 F oven for 20 mins till bubbly.
Day three of MoFo and all is well……. Well, sort of.
Zucchetti with Sun Dried Tomato Marinara Sauce
I was browsing around the internet, soaking in all the wonderful vegan posts, and wham, go attacked by a computer virus. Basically the virus attached a secret encryption to all my files and the only way to get my files back was to go to a website and pay to get the secret code…………..I think not……. fortunately I do regular back ups, so a quick loading of the original dvd’s that came with the computer, everything is wiped off and reloaded. Thank goodness for external hard drives and backups. A little inconvenient but nothing too serious.
Zucchetti with Sun Dried Tomato Marinara Sauce
Continuing on with the theme of quick and easy (didn’t take too much time or effort to restore my computer) and delicious, todays recipe is for Zucchetti with Sundried Tomato Marinara Sauce. You could sub out they zucchetti (spiralized zucchini) with a pasta of your choice if you prefer.
This meal can be totally raw or if you like (as I did) you can add in fried mushrooms.
Enjoy,
Zucchetti with Sun Dried Tomato Marinara Sauce
Serves 2
2 or 3 zucchini spiralized (or 2 cups of cooked pasta of choice)
1 Cup sun dried tomato’s soaked in 1/2 cups hot water for 10 mins (reserve water)
1 Tblspn olive oil
2 plum tomato’s
1 handful fresh basil
1 garlic clove
Sauteed mushrooms and nutritional yeast if desired to garnish
Place spiralized zucchini on paper towels to absorb excess moisture.
Combine drained sun dried tomato’s, olive oil, plum tomato’s, basil and garlic in a blender or food processor. Process until fairly smooth. Add reserved tomato soaking water a tablespoon at a time until you reach the desired consistency.
Place zucchini on two plates. Spoon marinara sauce over top and sprinkle with sautéed mushrooms and nutritional yeast if using.
You may also gently heat the marinara sauce in a small pot before serving if you prefer a cooked sauce.
I like the sauce “raw” and it avoids one more pot to clean, adding to the “quick and easy” part of the recipe…….and it truly is delicious.
So, I am cheating a little with this one. Technically, I did not have Mac and Cheese when I was a child. Growing up in Australia it was not something I was aware of, however, once I moved to Canada, I soon found this warm, gooey, cheesy, pasta and fell in love at first bite. I soon made up for lost time and probably consumed an entire childhoods worth in the first couple of years living here. So, I guess this is my “second childhood” meal memory.
Roasted Red Pepper Mac and Cheese
As a vegan, I searched around for a great version of this dish and finally found this recipe by Isa Chandra at the Post Punk Kitchen. If you have not yet visited her site, you should head on over there pronto. The recipe Roasted Red Pepper Mac and Cheese is so good, when I made it, I ate the entire pot full.
Enjoy,
Roasted Red Pepper Mac & Cheese
By Post Punk Kitchen
Yield: 2 large servings
1/2 pound macaroni or other small pasta
3/4 cups raw cashews, soaked in water for 2 hours
2 teaspoons olive oil
1 small yellow onion, diced medium
2 cloves garlic, minced
2 cups vegetable broth
1 1/2 tablespoons organic cornstarch
1 tablespoon nutritional yeast (optional)
1 roasted red pepper (jarred or homemade)
1 tablespoon tomato paste
1 1/2 teaspoons pizza seasoning
1/2 teaspoon salt
1 teaspoon ground mustard
1/2 teaspoon turmeric
1. Preheat a 2 quart sauce pot over medium heat. Sauté onions in oil with a pinch of salt for 5 to 7 minutes, until onions are translucent. Add garlic and sauté for 30 seconds or so, then transfer to a blender or food processor.
2. Boil a large pot of salted water for cooking the pasta. Once boiling, cook pasta according to package directions.
3. Drain the cashews and add them to the blender along with the vegetable broth, corn starch, nutritional yeast, red peppers, tomato paste, pizza seasoning, salt, mustard and turmeric. Blend until very smooth. Scrape down the sides every 30 seconds or so and test for smoothness.
4. Transfer the sauce in the blender back to the sauce pot where you cooked the onions. Turn the heat up to medium and let cook, stirring very often, until thickened. This should take between 10 and 15 minutes. Taste for salt. It should taste slightly salty because you’re going to be pouring it on the pasta.
5. The pasta should be done while the sauce is thickening, so drain and place pasta back in the pot you cooked it in. Set aside.
6. When sauce is thickened, add it to the pasta in the pot, and use a large slotted spoon to mix well, taking care not to break the pasta.
For todays soup, I have made a Chickpea and Pasta soup with a Light Rye Bread. Very fitting for the first day of Fall.
Time is really slipping by this month. It is hard to believe we are already in the fourth week of Vegan MoFo. In order to complete my 20 posts, I will have to be a little creative and double up one day, as I have just realised that I will only be able to squeeze 19 in before the end of September. Oh Well, I guess I will just slip in one extra…..:)
Enjoy,
Chickpea and Pasta Soup with Light Rye Bread
Chickpea and Pasta Soup
Serves 10
1 lb dried chickpeas
2 tsp bicarbonate of soda
2 Tbsp flour
2 Tbsp salt
3 litres vegetable stock or water
3 rosemary sprigs
8 garlic cloves, peeled and crushed
1/2 cup extra virgin olive oil
1 lb skinned fresh tomatoes, seeded
10 oz small tubular pasta such as ditalini
flat-leaf parsley, optional
Put the chickpeas in a bowl and cover with plenty of water. Mix together the bicarb of soda, flour and salt and add enough water to make a thin paste. Stir this mixture into the bowl with the chickpeas and leave to soak for at least 12 hours – preferably overnight.
When the chickpeas have doubled their size they are ready to be cooked. Drain and rinse. Put them in a large stockpot and add the vegetable stock or water. Tie the rosemary sprigs in a muslin bag and add to the stockpot. Do not be tempted to just add the rosemary sprigs without the bag, as I did. The rosemary will fall apart and you will spend a long time fishing out the stems and leaves.
Add the garlic to the stockpot and pour in half the oil. Cover the pan tightly and bring to the boil. Lower the heat and cook over the lowest simmer until the chickpeas are tender, which can take two or three hours. Do not uncover the pan for the first hour and a half, or the chickpeas will harden. For the same reason, do not add any salt until the chickpeas are nearly ready.
When the chickpeas are tender, remove the rosemary bundle. Purée the tomatoes through a food mill or in a food processor and add to the soup with their juice. Stir well, add salt and pepper to taste and cook for a further 10 minutes or so. .
Before you add the pasta, check that there is enough liquid in the pot. You may have to add some boiling water. Now, add the pasta and cook till al dente. I like to add some freshly chopped flat-leaf parsley, but the glory of this soup will be undiminished if you prefer not to. Garnish with flat leaf parsley and drizzle with extra olive oil if you like.
Chickpea and Pasta Soup with Light Rye Bread
Light Rye Bread
Makes one loaf
1 ¾ cups + 3 Tablespoons warm water
2 ¼ teaspoons, or one ¼ ounce package active dry yeast
2 ½ cups bread flour
1 ½ cups light rye flour
1 ¾ tspn salt
1 Tbspn sugar
2 tspn caraway seeds
Activate the yeast
In a small mixing bowl, whisk together the warm water and yeast. Allow the mixture to sit for about 10 minutes so the yeast activates.
In a medium mixing bowl, whisk together the bread flour, light rye flour and salt until well incorporated.
In another medium mixing bowl, whisk together the sugar, caraway seeds and stir until just combined. Whisk in the warm water mixture from
Mix the dough
Add the wet ingredients to the bowl containing the dry ingredients and stir with a wooden spoon in one circular direction for 1 minute. Now stir in the opposite direction for 1 minute.
Coat the ball of dough in vegetable oil
Add about 1 Tablespoon olive oil to another medium mixing bowl and spread it around the inside with your fingers. Use a spatula to scrape the dough into the oily bowl. With dampened fingers, form the dough into a ball and rotate it around in the inside of the bowl so it’s coated in oil.
Let the dough rise
Cover the bowl with a plastic bag and let it rise in a warm place until it’s doubled in size, about 1 ½ hours.
Let the dough rise once more
Degass the dough by pressing on it with dampened hands several times until no more gas comes out of the dough. Form the dough into a ball again and let it rise until it’s doubled in size, about 1 ½ hours.
Proof the dough
The dough can now be proofed by gently forming it into a lightly oiled loaf pan and allowed to sit covered with a plastic bag until it reaches about 80% to 90% of it’s intended size, which should be about 40 minutes. The proofing stage is where the dough takes most of it’s shape. It’s important to leave room under the plastic bag so the dough can rise sufficiently.
Preheat your oven to 375F Remove the plastic bag so the dough can rest for about 10 minutes while your oven is preheating. During the baking process, the dough will rise another 10% to 20% of it’s intended size in the process known as oven spring. Bake 40 to 45 minutes or until the bottom of the loaf sounds hollow when the loaf pan is tapped.
Cool the bread completely before removing it from the loaf pan.
Is there anything more comforting that a bowl of chikn noodle soup. A rich broth packed full with chikn bites, carrots and celery all swimming together with flat noodles. This iconic dish is not just for when you are feeling sick, I like to curl up with a good book and a bowl of this soup for a cosy hour or two of relaxation.
Rosemary bread is the ideal pairing for this soup. I made this bread with regular flour, however if you want to make it Gluten Free, just sub out the regular flour with the Gluten Free Flour Mix (details on amounts etc are explained in this linked post).
Once again, this dish has multiple recipes (I really didn’t think this theme through, I seem to be making two or three different recipes each day). The Chikn is based on a recipe from The Gentle Chef. Baking the tofu gives it a nice “meaty” texture.
Enjoy,
Chikn Noodle Soup with Rosemary Bread Rolls
Chikn Noodle Soup
Serves 4
Ingredients
• 2 vegan chicken bouillon cubes
• 4 oz noodles or pasta of your choice (I used Linguine as I like a broad flat noodle. Once cooked, I cut the noodles into 2 inch lengths)
• ½ onion, chopped
• 2-3 cloves garlic, minced
• ½ cup chopped carrots
• ½ cup chopped celery
• Vegan grilled chicken strips, chopped into cubes or
shredded (about 1 cup) recipe below
• 1 tsp fresh oregano
• Freshly ground pepper
• 1 tbsp fresh lemon juice
Dissolve the bouillon cubes in 5 cups boiling water in a large soup pot. Meanwhile, cook the noodles.
Transfer ½ cup broth to a small saute pan, and cook onions and garlic over medium heat, for 5 minutes, or until softened.
Add the onions, garlic, carrots, celery, vegan chicken, and cooked pasta to the soup pot. Simmer over medium low heat for about 10-15
minutes, or until vegetables are softened.
Stir in oregano and season with freshly ground pepper. Squeeze in lemon juice at the end. Serve.
Once pressed, brush tofu on all sides with olive oil and bake in a moderate oven 325 for 1 hour. Allow to cool on baking sheet. Once cool slice off dry edges then cut into strips or cubes. Place tofu and marinade in a ziploc bag and seal. Let marinate for at least 2 hours or preferably overnight.
When ready to use remove from marinade and saute in olive oil.
Chikn Noodle Soup with Rosemary Bread Rolls
Rosemary Bread Rolls
Makes 4 large bread rolls
Ingredients
1 1/4 ounce packet active dry yeast
2 teaspoons sugar
2 tablespoons extra-virgin olive oil, plus more for brushing and serving
2 1/2 cups all-purpose flour, plus more for dusting
2 tablespoons dried rosemary
1 teaspoon fine salt
1/2 teaspoon kosher salt Freshly ground pepper
Directions
Stir the yeast, sugar and 1/4 cup warm water in a large bowl (or in the bowl of a stand mixer). Let sit until foamy, about 10 minutes.
Add 1 tablespoon olive oil, the flour, 1 1/2 tablespoons rosemary, the fine salt and 3/4 cup warm water; stir with a wooden spoon (or with the dough hook if using a mixer) until a dough forms.
Turn the dough out onto a lightly floured surface and knead, dusting lightly with flour if necessary, until smooth and elastic, about 10 minutes. (Or knead with the dough hook on medium-high speed, adding a little flour if the dough sticks to the bowl, about 8 minutes.)
Brush a large bowl with olive oil. Add the dough, cover with plastic wrap and let stand at room temperature until more than doubled, about 2 hours.
Brush 2 baking sheets with olive oil. Generously flour a work surface; turn the dough out onto the flour and divide into 4 pieces. Working with one piece at a time, sprinkle some flour on the dough, then fold the top and bottom portions into the middle. Fold in the sides to make a free-form square. Using hands gently shape into a more rounded roll. Place seam-side down on a prepared baking sheet. Repeat with the remaining dough, putting 2 balls on each baking sheet. Let stand, uncovered, until more than doubled, about 2 hours.
Preheat the oven to 400 degrees F. Bake the loaves 10 minutes; brush with the remaining 1 tablespoon olive oil and sprinkle with the kosher salt and the remaining 1/2 tablespoon rosemary. Continue baking until golden brown, about 10 more minutes. Transfer to a rack to cool.
Love is in the air. Next week is Valentine’s day and I was inspired to create a romantic dish for the occasion. What better way to show your love than to make a wonderful creamy Fettucine Alfredo and to have it “heart healthy” at the same time.
There is nothing in this delicious rich pasta sauce that is even remotely bad for you. The secret loving ingredient is the faithful cauliflower. This vegetable is a wonderous creation. Low calorie, crunchy when raw, perfect for dipping, smooth and creamy when cooked and pureed. I used brown rice pasta but if you wanted to take it even one step further in the health department you could use thinly sliced or spiralized zucchini or other hard vegetable.
Fettucccine Alfredo Amore
When I was dreaming up this dish, I had visions of lots of tiny red hearts sprinkled over the top. I would “cut” the hearts out of red peppers, simple…….not really. As you can see in the pictures the final result has three hearts. While they do look very nice, it is not exactly what I had in mind. These were more difficult than I imagined. Wether you make one, three or more, the thought is still the same, and, as they say, “it’s the thought that counts'”
Enjoy,
Fettucccine Alfredo Amore
Fettuccine Alfredo Amore
Serves 6
1 medium cauliflower
1/2 Tblspn olive oil
3 large garlic cloves minced or grated
1 cup unsweetened almond milk
1/4 cup nutritional yeast
1 Tblspn lemon juice
2 tspns onion powder
1/4 tspn ground black pepper
sea salt to taste
8oz dry fettuccine of choice, I used brown rice fettuccine
red pepper for garnish
parsley for garnish
Separate cauliflower into florettes. Place in large saucepan and cover with cold water. Heat on high until water begins to boil, reduce heat and simmer 5 – 10 minutes until tender. Drain and allow to cool slightly before processing further.
Heat olive oil in pan on low and saute garlic very gently for 5 mins. Do not let garlic brown.
Add cauliflower, garlic, half the almond milk, nutritional yeast, lemon juice, onion powder, pepper and salt to food processor ( you may have to do this in two batches). Pulse, scrapping down sides until everything is incorporated. Slowly add the remaining almond milk and blend on high until completely smooth and creamy, approx 3 – 5 mins. Set aside.
Fettucccine Alfredo Amore
Fill large pot with cold water, place on stove and bring to a boil over high heat. When water is boiling add dry pasta and cook according to directions on the packet.
Once cooked, drain and rinse.
If making red hearts, cut small piece of red pepper that is fairly flat. Using a sharp pointed knife, cut out hearts,
Add Alfredo sauce to drained pasta and toss together. Place serving on plate and top with red pepper hearts and parsley.
Spaghetti (squash) with Roasted Tomato Sauce and Meatballs
Wow, it is amazing that we are already closing in on the end of Vegan MoFo. Here is recipe #19 with just one more to go.
This was an easy one for me. Sometimes it is hard to decide what to make, but this was a natural.
When I opened up our CSA share this week, there was a huge spaghetti squash. This was perfect timing as last weekend I had picked up three big bags of perfectly ripe Ontario field tomato’s. They had just been put on the “reduced” rack at the store. Home they went, to be roughly chopped together with onions, garlic, red peppers some olive oil and salt and pepper and then into the oven to slow roast for an hour or so. I then pureed this into a tomato sauce. I froze this in freezer bags holding approx 2 cups each. I now have about a dozen packages of sauce in the freezer to use in the winter when fresh tomato’s are less than prime and totally overpriced, One bag came out for the spaghetti squash. Now all that was missing was a fantastic meatball.
I have tried a number of different approaches to the humble meatball to find a nice tasty solid version. I was toying with using my “beets meat” recipe but I have posted that twice recently, so went to another old favourite. This meatball has a nice texture and is very easy to make. They also freeze well.
The best part about this recipe is that by using the squash as the pasta, you can go back for seconds (or, in my case thirds) without feeling guilty.
Recipe # 20 is next, and as I mentioned earlier, it is to be a Grand Finale. Stay tuned and get ready for a sweet ending to Vegan MoFo.
Enjoy,
Spaghetti (squash) with Roasted Tomato Sauce and Meatballs
Spaghetti (squash) with Roasted Tomato Sauce and Meatballs
Serves 6
1 large spaghetti squash
1 whole head of garlic plus 6 cloves
2 tblspns olive oil
sea salt and black pepper
1/2 cup chickpea flour
1/4 cup sunflower seeds
1/2 onion, finely diced
1/2 tspn fennel seeds
1/4 tspn smoked paprika
1/4 tspn red pepper flakes
2 tblspns lemon juice
handful fresh basil
1/2 tspn dried oregano
1/2 tspn dried parsley
1/2 tspn dried sage
2 tspns nutritional yeast, plus extra for topping
1/4 cup water
4 large ripe tomato’s roughly chopped
2 medium onions roughly chopped
4 garlic cloves, minced
1 large red pepper, seeded and roughly chopped
Extra olive oil
Preheat oven to 375
Cut spaghetti squash in half lengthwise. Remove seeds.
Grate one head of garlic and mix into 2 tblspns olive oil. Place squash cut side up on baking sheet. Cover with garlic oil mixture. Sprinkle with salt and pepper. Bake uncovered for 40 mins. Remove from oven and let cool for at least 10 mins. Remove “spaghetti” strands from skin with a fork. Set aside.
Note: Depending on the size of your squash, you will need to adjust the cooking times. In this case, mine was huge (straight from the farm) and took closer to 1 1/2 hours to cook. Just keep checking by poking with a fork until it is tender.
Spaghetti Squash
Spaghetti Squash Cooked
Meatballs:
Preheat oven to 400
Combine chickpea flour, sunflower seeds, 1/2 onion, 2 cloves garlic, fennel seeds, paprika, red pepper flakes, lemon juice, basil, oregano, parsley, sage and nutritional yeast in food processor.
Process until almost smooth, adding water as necessary. Mixture should be thick enough to roll into balls.
Roll into balls and place on baking sheet, lined with parchment paper.
Bake for 15 – 20 mins or until starting to brown. Remove from oven and let sit for 5 mins before serving.
Tomato Sauce:
Preheat oven to 375
Combine tomato’s, roughly chopped onions, 4 minced garlic cloves and roughly chopped red pepper with enough olive oil to coat. Add salt and pepper to taste. Bake uncovered for at least 1 hour, stirring occasionally. The longer you bake this the better, you want the onions to caramalize.
Tomato, onion, garlic and olive oil
Roasted tomato onion and garlic
Remove from oven, allow to cool slightly then puree in food processor in batches.
To serve, place a nest of spaghetti squash on plate, top with 4 – 6 meatballs, ladle tomato sauce over the top and sprinkle with extra nutritional yeast if desired.
Spaghetti (squash) with Roasted Tomato Sauce and Meatballs
Happy Saturday everyone. Dont you just love weekends?
We are having a very “Fall” day today, dark, cold and light rain. I am curled up on my sofa listening to the “Easy Listening” channel on the TV, with a cup of coffee in one hand and giving Cooper his neck scratch with other.
Fortunately, I made this recipe a couple of days ago, so it is all ready to post.
I have mentioned before that I have a pasta addiction, every few days, I have a craving for a pasta dish. I love traditional pasta, but try to use a brown rice version more often than not. I love the Tinkyada brand, it cooks up the best of all I have tried, and so far, I have not seen it listed anywhere for using GMO ingredients,
I always make enough to have leftovers the next day and this recipe tastes even better the day after.
Enjoy,
Edamame Mushroom Penne with Toasted Sesame Seeds
Edamame mushroom and Brown Rice Penne
Serves 4
1 cup frozen edamame beans
4 tblspns olive oil
2 cups brown rice penne
2 tblspns sesame seeds toasted
3 large Pportobello or equivalent cremini mushrooms
4 cloves garlic minced
2 tblspns rice wine vinegar
1 cup roma tomatoes chopped
½ c up fresh basil chopped
½ cup fresh parsley chopped
Slice mushrooms into thick chunks.
In a large pot bring 8 – 10 cups water to a boil. Add frozen edamame and cook till bright green. Remove immediately and set aside.
Edamame and Mushroom Penne with Toasted Sesame Seeds
In the same boiling water, add pasta. Cook till al dente. Drain paste, leaving 1 cup cooking water in the pot. Return pasta to the pot with the water and cover.
Edamame and Mushroom Penne with Toasted Sesame Seeds
Toast sesame seeds. Place seeds in a dry (no oil) pan, let cook over medium heat until seeds just start to turn a golden colour and they smell toasty. Remove from heat and set aside.
Edamame and Mushroom Penne with Toasted Sesame Seeds
Heat olive oil over medium heat. Add mushrooms and sauté until soft. Add minced garlic and vinegar. Cook covered on low for 5 mins.
Edamame and Mushroom Penne with Toasted Sesame Seeds
Add edamame and tomato’s and herbs. Allow to just heat through.
Edamame and Mushroom Penne with Toasted Sesame Seeds
Add this mixture to the cooked pasta, Season with salt and pepper to taste. Sprinkle with toasted sesame seeds.
Serve
Edamame and Mushroom Penne with Toasted Sesame Seeds
The weather here is still quite cool, especially for summer 😦 So to cheer myself up, I headed to comfort food.
For me, either pasta or potato’s (or at times both, if I am in a real funk) always do the trick.
This week I put together a creamy, garlicy pasta. The roasted garlic and paprika give the dish a nice smokey flavour. If you prefer to go soy free, you can substitute 1 cup white kidney beans for the tofu. This will not be quite so creamy, but still very delicious.
We are happily receiving wonderful CSA baskets each week. It is hard to believe we are already at week 7. I love receiving my email on Sunday night that lists what will be in the next baset. My fridge is always full of wonderful fresh produce. Thank you Ryan and Isabelle.
CSA Week Seven
So, what to do with all these goodies? I usually do a stir fry and a “Buddha Bowl” (mixture of steamed veggies and brown rice with a little soy sauce). These are both great to do ahead in a big batch, then they are ready for quick suppers or to grab to take to work for lunch.
Cooper (the wonder dog), is always happy when I start cooking the veggies. He thinks he is vegan too. He just loves carrots and sweet potato and apple slices. He always gets four slices of whatever I am cutting up. He knows he gets four, and if I try to shortchange him, he just gives me “the look”.
I have also started back into juicing again. I had gotten out of the habit, but now with all these greens, especially the beet tops, I am re-motivated. So far, I do not usually have anything left over at the end of the week. If I don’t eat it, Cooper does 🙂
This week I will also be making a Roasted Tomatillo and Green Olive Salsa out of the lovely basket of Tomatillo’s you can see in the bottom right of the picture. I will post that recipe too soon.
Enjoy
Creamy Roasted Garlic Linguine
Creamy Roasted Garlic Linguine
Serves 4
1 head of garlic left whole
Olive oil
½ package silken tofu
2 Tblspns nutritional yeast
½ tspn paprika
Salt and pepper to taste
4 cups Cooked pasta of choice
Pre-heat oven to 325. Cut the top off the head of garlic so that a little of each clove has been taken off. Drizzle with olive oil. Place garlic on baking sheet and bake for 30 mins.
Roasting Garlic
Allow garlic to cool slightly. Gently squeeze the soft garlic cloves out and place in blender.
Add tofu, nutritional yeast and paprika. Blend until smooth and creamy. Add a little water if necessary to thin.
Driving home last night with my basket full of fresh organic produce from my wonderful farmers, Ryan and Isabelle from Field Good Farms, the aroma of just picked basil filled the car. By the time I turned into my driveway, I was torn between making a pesto pasta sauce or an old favourite known as “Gernat’s Pasta”. So, instead of choosing between these two taste sensations, I made (and ate) them both 🙂
Pasta two ways
Whenever I smell fresh basil, I immediately think of “Gernat’s Pasta”.
Many years ago, when I still lived in Australia, we had a young man from Italy visit with us. We prepared a nice BBQ dinner for him and he enjoyed it immensely. He wanted to thank us, and asked if he could come back the next night and cook a meal for us.
The next day, Gernat arrived armed with pasta, basil, tomatoes’, garlic, onions, parmesan cheese and olive oil. Within minutes the most delicious aroma’s were coming from my kitchen.
Gernat explained that this sauce, while incredibly simple, is bursting with flavour, and he was not wrong. To this day, whenever I smell basil, I am reminded of him and the wonderful meal he prepared for us.
Enjoy,
Tracy 🙂
Gernat’s Pasta
Serves 4
Gernat’s Pasta
3 Tblspns olive oil
2 large onions chopped very finely
4 cloves garlic minced finely
3 large tomatoes chopped finely
large handful fresh basil finely sliced
1/4 cup nutritional yeast plus extra to sprinkle on top
salt and freshly ground black pepper to taste
pasta of choice cooked (I used brown rice linguine) enough for 4 servings
Heat oil in pot over medium heat. Add onions and garlic (test with a little piece of onion to see if the oil is hot. By adding the onions and garlic to hot oil, so that they immediately start to sizzle, you release all the flavours) Cook for 3 to 5 mins until onions soften.
Add tomatoes’ to the pot and continue to cook over medium/low heat (mixture should be slowly simmering, but not sticking to the bottom) for at least 20 mins to allow all the flavours to mix.
Gernat’s Pasta Sauce Simmering
Add finely sliced basil and nutritional yeast. Mix well and let simmer 2 or 3 mins longer. Add salt and pepper to taste.
Serve over pasta of choice, sprinkle with extra nutritional yeast.
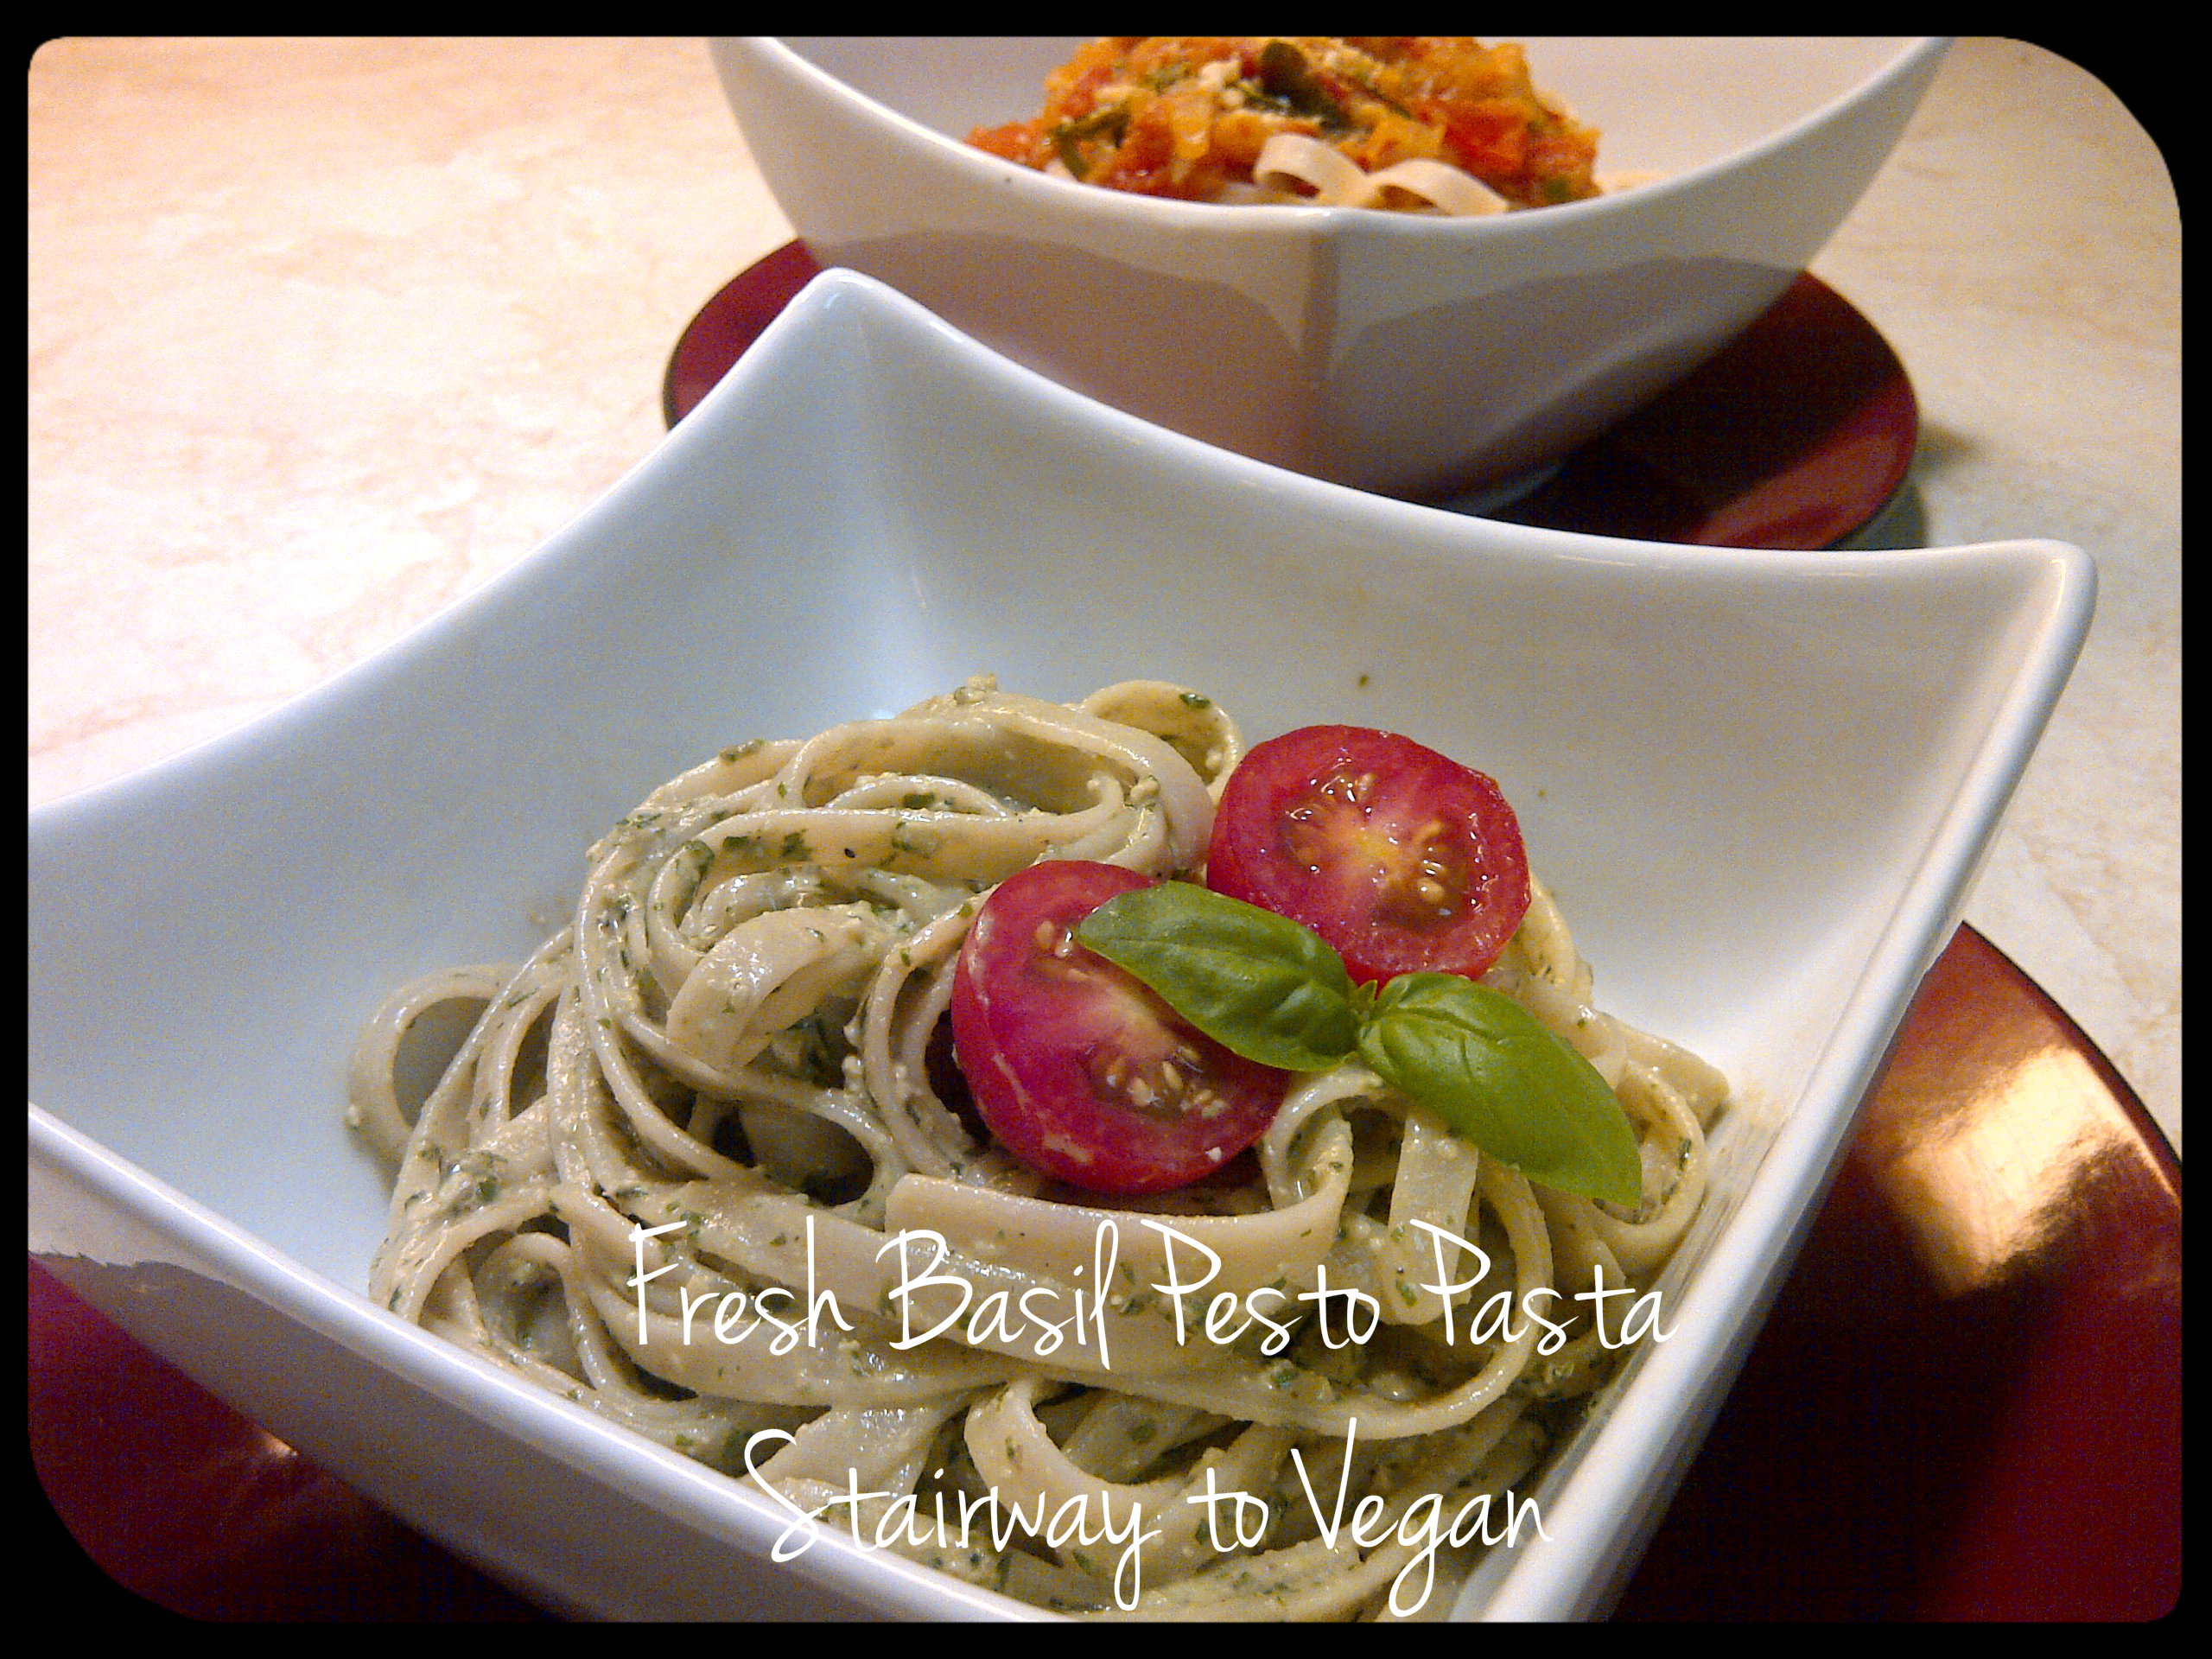
Fresh Basil Pesto with Pasta
Serves 8
Fresh Basil Pesto Pasta
1/4 cup olive oil
1/2 cup walnuts
2 cups fresh basil tightly packed
1/2 cup nutritional yeast
4 cloves garlic
salt and freshly ground black pepper to taste
pasta of choice cooked (I used brown rice linguine) enough for 8 servings
Place all ingredients except pasta into food processor and process until a paste.
Basil Pesto Prep
You will have to stop the processor and scrape down the sides multiple times.
Toss pesto with cooked pasta (you may need to thin the pesto with a little water). Unused pesto will last 2 or 3 days in the fridge, or you can freeze for up to three months.